
When we set out to do this project we had no idea how to make this happen. However, we figured it could be done. People hang porch swings all the time, we decided to look at how those are constructed and go from there.
Here is a picture of our plans (sorry the writing is so small)
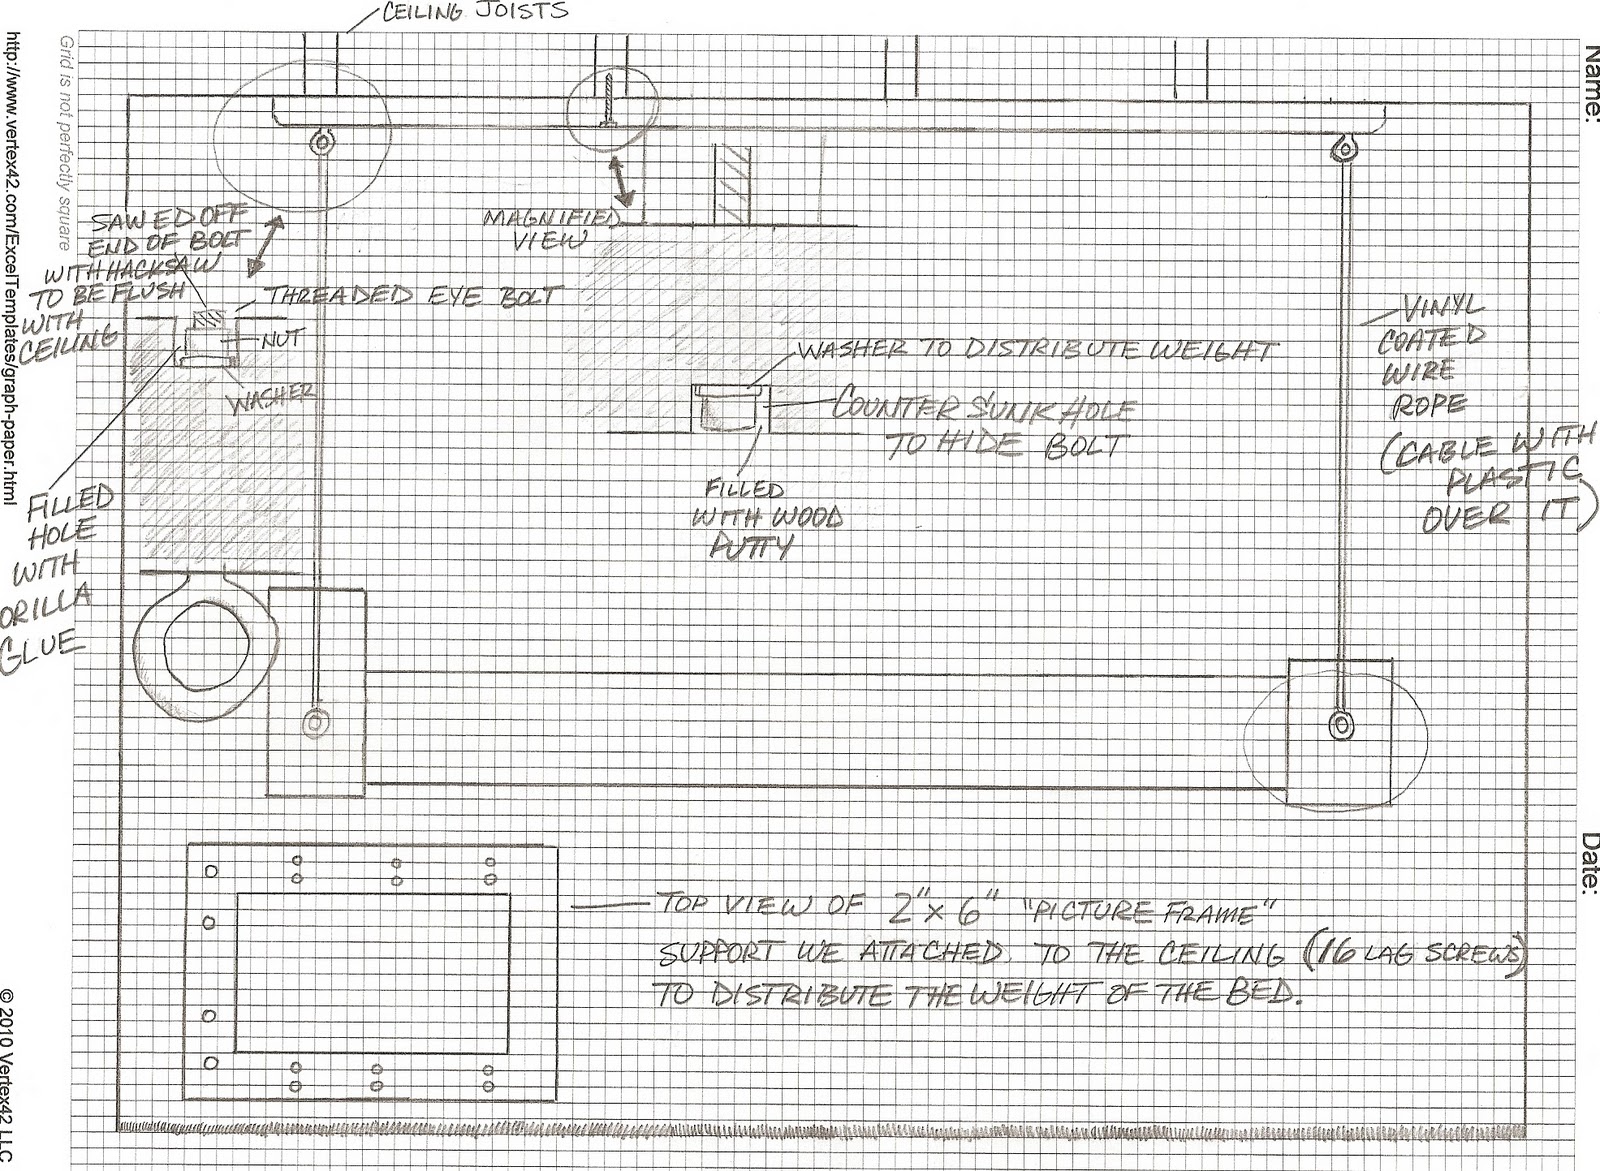
Now I will walk you through it.

This is just a huge rectangle, the same size as a twin bed, attached to the ceiling. We used 2x6's to make this frame. Our neighbor helped us with this part. He has an amazing wood shop but I think he might be in the Mormon Mafia or Witness Protection Program or something. He wouldn't let me take any pictures. He claimed he had to maintain a security clearance and he can't pop up on any Internet sites. (Whatever, I have a blog to do, what's more important:) Anyway, we routered the edges in his shop and then joined them together using an awesome tenon joinery system he had (ya, it's on my x-mas list).

Then we added Gorilla Glue to hold the bolt tight.


see the Gorilla Glue dripping
Next we found all the ceiling joists with a stud finder and drew lines on our ceiling marking the joist. Ceiling joists are 16 inches apart on center meaning the center of one joist is 16 inches away from the center of the next joist.
Then we sawed off the rest of the bolt with a hack saw.

If you look close you can see our pencil marks on the ceiling
This is probably the most important step of the whole process. It must be secured to the center of the joist for this to be strong enough to hold this woman

(oh wait that's me)
We attached the frame to the ceiling with 16, 4-inch lag screws. We counter sunk the head of the screw
We puttied the holes.
Then I spray painted it black using Krylon spray paint in a satin finish.


I know it would have been a lot easier to paint the frame before we installed it but I rarely do things the easy way. (I protected the ceiling with poster board.)
I also think it would have been cute to add bead board to the center. But I had already added enough projects to the basement and marriage counseling is like $75 an hour, and this is supposed to be a thrifty DIY blog.
Next I made the bed. I used a 20+ year old bunk bed that we had lying around. I cut the legs off and added bead board to the head board and foot board, then just painted it with Krylon satin black spray paint.
We attached eye bolts to the bed


Looks like this when squished

We used this quick link to connect the cable to the eye bolt just in case we need to move the bed for some reason.

And now we have this

This bed is strong. I would never let my daughter sleep on it if it weren't. Each cable holds 1500 lbs. My daughter is a tumbler and the bungee system at her gym is constructed very similar.
Just a few details. The bedding is from Walmart.com, it is called, Twilight Garden, was $35.00 when we ordered it.
Paint colors- We used Porter Paint, Silken Touch, the color is Hot Pink Kiss (this covered in two thick coats, not bad for pink) We used a gray primer underneath because this was new construction. The Gray walls are also Porter Paint, Silken Touch, the color is Flagstone. (We added a sparkle mix-in to the gray paint. The idea was to make it sparkle like Edward. Edward is fake and this didn't work. Don't waste your money.)
We hope to finish the rest of the room soon. Thanks for reading and happy swinging!!
I am linking this project up to the DIY CLUB monthly contest here's the link (and maybe a few other places.)


Thanks for all the details. I had so many questions! That is too funny about your neighbor! {Nice of him to help you out though.}
ReplyDeleteGreat bed and great post! I do have one question though. Does the bed move alot when she is lying on it and does it hit the wall?
ReplyDeleteThe bed swings gently. I am sure she could really get it swinging if she gave herself a good push. I wouldn't put this in a room with 8 year old boys. We are adding a padded bumper chair rail type thing to the wall behind her bed (net yet finished) It is really quite relaxing to sleep on. Not sure about flu season though.
ReplyDeleteIt looks fantastic.. awesome job!!
ReplyDeleteThat looks like so much fun! I would have LOVED that as a kid!
ReplyDeleteomg!! this is my dream!!
ReplyDeletegreat work!!
That is SO COOL!!! I love it... I'm putting it int the Spotlight at the PoPP.
ReplyDeleteMy cousin made a bed much like this in her basement for her grandson to sleep in. He can keep lots of stuff under the bed. Yes, it swings a little bit, but not hard enough to hit any of the walls. I would say she's got about a foot clearance around the two side closest to walls. Close enough you can reach out and give yourself a little push for a gentle rocking chair like motion. I slept in her bed (I'm well over 200lbs) and not one creak. Of course she didn't have a finished ceiling in her basement, just bolted the 4 corners straight into her joists. IF/When I have my own home, I'm thinking of making one of these for me.
ReplyDeleteWow! That is awesome! Great tutorial and beautiful results. What a fun bed! Thanks for sharing! ;)
ReplyDeleteRoeshel
WOW this is amazing. You did an amazing job.
ReplyDeleteSeveral years ago I saw this on Trading Spaces. Thank you for sharing this on www.thediyclub.com
I hope your weekend has been filled with lots of fun.
Cheri
So cool, what a great job. Congrats on making the Top 10 at DIY Club.
ReplyDelete