Here are the before pictures of this room. I know it is hard to see but there were so many holes to patch it looked like a bad Venetian plaster job.

First I patched, primed and painted this room.
My son really wanted diagonal stripes. I wanted a room he could have for a while and not out grow. This is what we came up with. When I started this I really had no plan as far as width of stripes and how many stripes. If I did I would have changed it along the way. I do my best work with no plan.
I started by snapping a chalk line then masking it off with tape. Then measuring up 18 inches and masking another line. (If I had someone around to help I would have done less measuring and more chalk lines.)
We have this weird wall in this room so I continued the stripes around this room. This was the trickiest part. It took three tries to get the angle right. I just went with what I felt looked right. My husband asked why I didn't figure it out mathematically. (How do you do that?)
After that it is just a matter of masking and painting. I tried a few things to see what would give me the crisp lines I wanted.
I tried using a putty knife to press on the tape making sure it was sealed well. That helped a little but the line was definitely fuzzy.
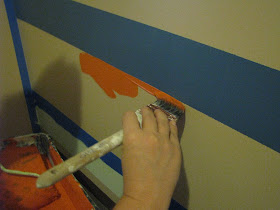
Once I had a line on both sides I could use as a guide, I was able to use my Purdy brush and get a good line without tape. This saved a lot of time. I had to go slow but I didn't have to tape. I love my Purdy brush.
(The top is blue paint not blue tape)
A great tip for a crisp line is to mix a little caulk with water and spread it over the edge of the tape with your finger. Let it dry for a minute, then paint. This creates a great seal. Just be sure to remove the tape while the paint is still wet.
(okay this pic is from a different project, but you get the idea)
This chocolate brown line was done this way. Super crisp lines but time consuming.
After a lot of touch up the stripes were finished
This project was very fun but really time consuming. I think the stripes took me at least 12 hours to do. I would recommend convincing someone to help you. I tried to use paint I already had and mix paint together to make the colors I didn't have (I have a lot of leftover cans of paint). For this project I spent $14 on paint and $7 on tape. I feel it is a big impact for $21.


That is fantastic! and for the cost! sheesh! Please! I love the colors and the diagonal.
ReplyDeleteit looks good !
ReplyDeletethat looks awesome! i love the colors you used, and how you snuck in a little white, but mostly that you did these on a diagonal! such an interesting element.
ReplyDeletestopping over from blue cricket design.
www.thecapeonthecorner.blogspot.com
This looks amazing! Thanks for linking!I'll be featuring this on BCD tomorrow afternoon! Love it!
ReplyDeleteBecca
I've been anxious to see it. Thanks for posting. It looks good! Can't wait to see the whole house in person.
ReplyDeleteYou did a fantastic job! It looks like a professional job. Thanks for the caulk & water tip. Centsational girl just did a post about how to get crisp lines a couple of weeks ago, but I didn't see that one. One was to use the base color of the wall to go over the tape before you start your project. I suggested glaze if you have it, but I think yours is probably more cost effective and you don't have to waste your glaze. I'm visiting from Remodelholic, but I'm following now :)
ReplyDeleteHoly cow! It's fabulous. I can't begin to imagine doing this, even horizontally or vertically. But diagonally? Heck, no! Lucky boy!
ReplyDeleteI haven't tried the caulk trick, so thanks. Usually what I do is lay down the tape and paint over the tape edge with basecoat color (on knockdown texture). This seals really well. Then paint the other color and lift the tape off.
Does that make any sense at all? Probably not. Maybe I should do a blog post, lol.
Thanks so much for linking up to Passion for Paint this weekend. Hope you're having a well-deserved relaxing one!
Great decorating ideas! these will be a big help for us avid home decorator.
ReplyDeletei'm an avid home decorator from houses in stoke on trent .
Hi nice reeading your post
ReplyDelete