Sorry, no posts lately. We have been too busy doing carpet angels.
We are still working on our finish electrical and we went to install our doors and with the carpet and pad they are too long. We will have to cut them down. GRRR. I hope there is a YOUTUBE video for that.
.
Monday, October 25, 2010
Tuesday, October 19, 2010
Paint Part 2
With all the wood work taped off we sprayed the ceiling. We painted it the same color as our wood work only in a flat sheen. I love it. It really helps it seem less like a basement.
I am super cheap. Sometimes I like to sugar coat it and say I am thrifty or frugal but lets be honest, I am cheap. Because I am so cheap, I hate wasting money. Good paint is dang expensive but there is a difference. Cheap paint has less acrylic in the can. As long as there is some acrylic in the paint they can call it acrylic paint. Acrylic is what makes paint dry hard and therefore cleanable. If you are going to repaint so often that your square footage is shrinking because of all the layers of paint it probably doesn't matter what paint or primer you use. But, if you want it to look good for a long time with out repainting every couple of years good paint is worth the investment.
Carpet comes today. Yeah!
We put the painted doors inside the closet and taped it up so we wouldn't get any wall color on them
We let the ceiling dry for 24 hours then taped it off
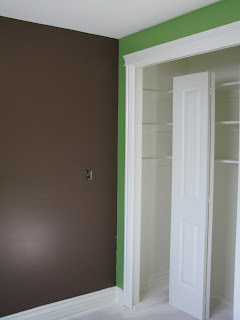
We then sprayed the walls and now we have this.
bedroom
bedroom
This brown paint smelled like chocolate when it was wet. Probably just the power of suggestion but three different people walked into this room and commented on the smell.
I can't wait to get stuff in these rooms. If you are into subtle decor, these rooms aren't for you. They are bold and fun.
family room
someday we will add a chunky fireplace mantle
We are going to add picture frame molding under the chair rail someday soon (hopefully)
We are going to add small kitchenette here
I am super cheap. Sometimes I like to sugar coat it and say I am thrifty or frugal but lets be honest, I am cheap. Because I am so cheap, I hate wasting money. Good paint is dang expensive but there is a difference. Cheap paint has less acrylic in the can. As long as there is some acrylic in the paint they can call it acrylic paint. Acrylic is what makes paint dry hard and therefore cleanable. If you are going to repaint so often that your square footage is shrinking because of all the layers of paint it probably doesn't matter what paint or primer you use. But, if you want it to look good for a long time with out repainting every couple of years good paint is worth the investment.
Carpet comes today. Yeah!
Wednesday, October 6, 2010
Painting the Basement, Part 1
I can tell I am an amateur blogger because whenever I have the biggest projects going on in my home I have nothing going on in blog land. Also, the busier I am the less pictures I take. I'll have to work on that.
This is how my basement looks today. Thanks to our friend (Mr. K.) who knows a lot about paint. I'll walk you through the steps so far.
First, we taped off everything we didn't want paint on like tile, windows etc.
Mr. K has two sprayers that look like this.
One is for oil based products and the other is for water based products. He first sprayed all the wood work with a lacquer under coater. This stuff in pricey, like $45 a gallon, his price, but it is a really awesome sealer. As soon as he finished with the under coater he primed everything. He used tinted primer where we were applying color.
We waited for this to dry overnight. Then we lightly sanded everything. We used a pole sander for the walls and a sanding pad for the wood work and doors.
Then we spackled and caulked all the dings and mistakes. and gave everything a good vacuum
Then Mr. K. came back he brushed a little primer over all of our spackle patches and sprayed a final coat in all the woodwork.
We are letting this cure for 48 hours before we begin taping it all off. He will paint the ceiling next.
Subscribe to:
Comments (Atom)


