

Thursday, November 11, 2010
Diarrhea of a Limpy Kid??
So my son did his very first book report on his favorite book. Diary of a Wimpy kid. This is the poster he proudly made.
 My youngest daughter just couldn't get the title right and kept calling it "Diarrhea of a Limpy Kid." I am not sure that book is on the approved book list. Somehow Gumby, Living with Irritable Bowel Syndrome doesn't feel like a Newbery Award Winner. What do ya think?


Monday, November 8, 2010
How To Hang a Bed

When we set out to do this project we had no idea how to make this happen. However, we figured it could be done. People hang porch swings all the time, we decided to look at how those are constructed and go from there.
Here is a picture of our plans (sorry the writing is so small)
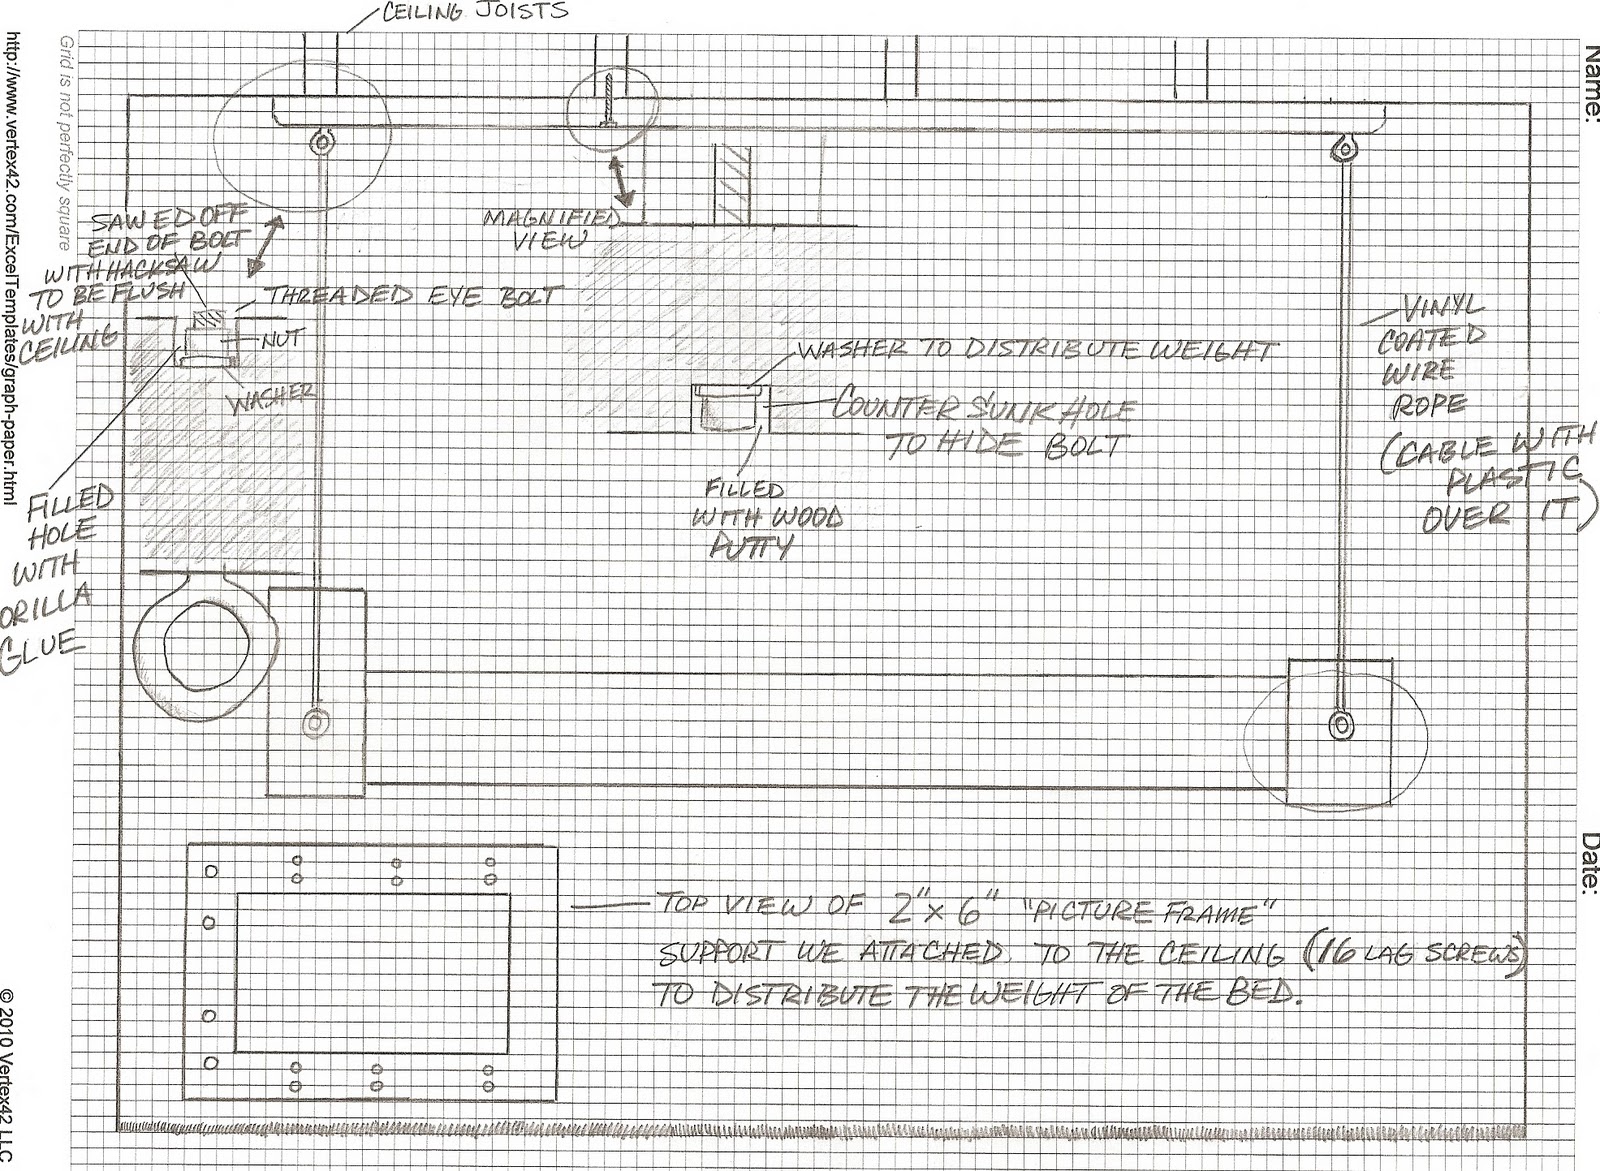
Now I will walk you through it.

This is just a huge rectangle, the same size as a twin bed, attached to the ceiling. We used 2x6's to make this frame. Our neighbor helped us with this part. He has an amazing wood shop but I think he might be in the Mormon Mafia or Witness Protection Program or something. He wouldn't let me take any pictures. He claimed he had to maintain a security clearance and he can't pop up on any Internet sites. (Whatever, I have a blog to do, what's more important:) Anyway, we routered the edges in his shop and then joined them together using an awesome tenon joinery system he had (ya, it's on my x-mas list).

Then we added Gorilla Glue to hold the bolt tight.


see the Gorilla Glue dripping
Next we found all the ceiling joists with a stud finder and drew lines on our ceiling marking the joist. Ceiling joists are 16 inches apart on center meaning the center of one joist is 16 inches away from the center of the next joist.
Then we sawed off the rest of the bolt with a hack saw.

If you look close you can see our pencil marks on the ceiling
This is probably the most important step of the whole process. It must be secured to the center of the joist for this to be strong enough to hold this woman

(oh wait that's me)
We attached the frame to the ceiling with 16, 4-inch lag screws. We counter sunk the head of the screw
We puttied the holes.
Then I spray painted it black using Krylon spray paint in a satin finish.


I know it would have been a lot easier to paint the frame before we installed it but I rarely do things the easy way. (I protected the ceiling with poster board.)
I also think it would have been cute to add bead board to the center. But I had already added enough projects to the basement and marriage counseling is like $75 an hour, and this is supposed to be a thrifty DIY blog.
Next I made the bed. I used a 20+ year old bunk bed that we had lying around. I cut the legs off and added bead board to the head board and foot board, then just painted it with Krylon satin black spray paint.
We attached eye bolts to the bed


Looks like this when squished

We used this quick link to connect the cable to the eye bolt just in case we need to move the bed for some reason.

And now we have this

This bed is strong. I would never let my daughter sleep on it if it weren't. Each cable holds 1500 lbs. My daughter is a tumbler and the bungee system at her gym is constructed very similar.
Just a few details. The bedding is from Walmart.com, it is called, Twilight Garden, was $35.00 when we ordered it.
Paint colors- We used Porter Paint, Silken Touch, the color is Hot Pink Kiss (this covered in two thick coats, not bad for pink) We used a gray primer underneath because this was new construction. The Gray walls are also Porter Paint, Silken Touch, the color is Flagstone. (We added a sparkle mix-in to the gray paint. The idea was to make it sparkle like Edward. Edward is fake and this didn't work. Don't waste your money.)
We hope to finish the rest of the room soon. Thanks for reading and happy swinging!!
I am linking this project up to the DIY CLUB monthly contest here's the link (and maybe a few other places.)

Wednesday, November 3, 2010
Hanging Bed
Never watch HGTV with you daughters. I am warning you, don't do it. Or you will find yourself doing a project like this one. My daughters love to watch all those before and after shows with me and while sometimes it feels like I am raising my best buds, it can really get you into trouble. My daughter first saw a hanging bed on "That's so Raven" she knew she had to have one. (Never mind that the bed she saw was on a TV set who had professional carpenters on the payroll.) This is what we came up with.
First the before ( I love "before and after" posts, but this is really a, "before and after so far" post, because this room is far from done.


 We used a 20 year old (at least) bunk to make the bed. We just cut it down, added bead board to the head board and foot board and put it back together. (Notice the milk crate she is using as a stool to get up on this thing. Like I said before this room is far from done.)
This project has a lot of steps so check back and I will walk you through what we did.
First the before ( I love "before and after" posts, but this is really a, "before and after so far" post, because this room is far from done.

This project has a lot of steps so check back and I will walk you through what we did.
Subscribe to:
Posts (Atom)


